
Most developers treat PNG compression like a black box with a single slider. In reality, squeezing a PNG down to its absolute smallest file size requires two completely different engines working in tandem: a lossy palette selection pass and a lossless deflate optimization pass.
Understanding how these two stages interlock explains why default export tools leave so much extra weight behind—and why skipping either step costs valuable kilobytes.
The Core Architecture: A Two-Stage Pipeline
PNG optimization isn’t a single algorithm. It’s a pipeline that stacks two independent reduction techniques, each targeting a different type of redundancy in digital images.
Original 24-bit RGB Image
         │
         ▼
 ┌─────────────────────────┐
 │ Pass 1: Palette Selection│ ──► Drops color depth (Lossy, Optional)
 └───────────┬─────────────┘      Saves ~70% on UI & flat graphics
             │
             ▼
 ┌─────────────────────────┐
 │ Pass 2: Deflate Optimiser│ ──► Squeezes row data (Lossless, Mandatory)
 └───────────┬─────────────┘      Saves 5–25% via row filtering
             │
             ▼
   Optimized PNG Output
Pass 1: Picking a Palette (The Lossy Step)
Most graphics ideal for the PNG format—screenshots, brand assets, UI mockups, and vector art—don’t actually use the 16.7 million colors available in 24-bit RGB. They usually rely on a couple hundred distinct shades at most.
A truecolor 24-bit PNG stores 3 bytes (24 bits) for every single pixel. Converting that same graphic into an indexed palette PNG drops the payload to 1 byte (8 bits) per pixel, plus a tiny 768-byte lookup table embedded at the top of the file.
The Math Behind the Savings
Consider an uncompressed $1920 \times 1080$ UI mockup:
- Truecolor (24-bit RGB):$\approx 5.9 \text{ MB}$ raw pixel payload
- Indexed Palette (8-bit):$\approx 2.0 \text{ MB}$ raw pixel payload
That is roughly a 70% reduction before the main compression algorithm even touches the file.
How Quantization Operates
The color quantizer scans the full-color pixel grid and builds a color map containing up to 256 representative entries. It then reassigns every original pixel to its nearest matching color index.
Because subtle shade variations get mapped to shared palette slots, this step is inherently lossy. However, by applying perceptual quality bounds (like SSIM binary searches), the color shifts are virtually invisible to the human eye.
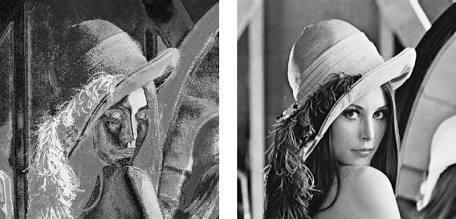
Pass 2: Optimizing Deflate (The Lossless Step)
Once an image is indexed—or kept truecolor if color shifts can’t be tolerated—Pass 2 takes over to re-encode the file itself.
Pass 2 never changes pixel colors. The output is bit-for-bit identical to whatever input Pass 1 delivered. Its job is purely about finding the most efficient way to package the underlying data stream.
Predictive Row Filtering
PNGs don’t compress raw pixel values directly. Before feeding data to the DEFLATE engine, the encoder applies a predictor filter to each horizontal line of pixels. Each row gets assigned one of five standard filter modes:
- None: Stores raw pixel values as-is.
- Sub: Stores the difference between the current pixel and the pixel to its left.
- Up: Stores the difference between the current pixel and the pixel directly above it.
- Average: Uses the average of the left and top neighbors as a baseline.
- Paeth: Uses a linear function of left, top, and top-left pixels to predict values.
Row Filter Mode (1 Byte) + Filtered Pixel Differences ──► DEFLATE Stream
Naive Encoders vs. Multi-Pass Optimizers
A basic PNG encoder picks one filter strategy and applies it blindly to every row in the file.
A multi-pass optimizer tests all 5 filters on every individual row, experiments with different DEFLATE strategy combinations (search window sizes, compression levels, lazy matching thresholds), and keeps the combination that produces the smallest binary file. On synthetic graphics and UI elements, this extra effort trims another 5–25% off the final size.
Smart Bypass Rules: Knowing When to Skip Steps
A well-designed encoder doesn’t blindly run every step on every image.
- Pre-Indexed Files: If an input file is already an 8-bit palette PNG (detected by checking if the
PLTEchunk is under 768 bytes), Pass 1 is skipped entirely. Re-quantizing adds CPU overhead for zero gain. - Photographs: Photos contain continuous gradients with thousands of subtle variations. Quantizing a photograph creates visible banding artifacts. On photos, Pass 1 is bypassed to protect image quality, leaving Pass 2 to handle lossless squeezing.
- The 3% Threshold Rule: Re-encoding a file that is already well-compressed can produce a new file that differs by only a few bytes. If total savings fall below ~3%, the pipeline hands back the original file untouched, preserving the original file creation dates and bitstream layout.
Anatomy of an Optimized PNG File
When the pipeline finishes, it outputs a streamlined binary structure with all non-essential bloat removed:
| Chunk Name | Role in File | Presence |
IHDR | Specifies dimensions, bit depth, and color type | Mandatory |
PLTE | Stores the 256-color lookup table | Palette mode only |
tRNS | Handles alpha transparency for palette colors | Optional |
IDAT | Holds the DEFLATE-compressed, filtered pixel rows | Mandatory |
IEND | Marks the end-of-file boundary | Mandatory |
Stripping Ancillary Overhead
Metadata chunks like tEXt (software signatures and comments), tIME (last modification timestamps), and eXIf profiles don’t affect how an image renders on screen. Stripping these chunks by default removes 1 to 10 KB of unneeded metadata from every image.
Leave a Reply