
The Ultimate Guide to Image Compression
We’ve all been there: you attach a dozen photos to an email, click send, and instantly get hit with a bounce-back message saying your file is too big. Or you’re trying to upload a quick photo to a site, only to face a frustrating red error box telling you to shrink the image first.
Back in the early days of the internet, people ran into this exact same headache trying to send images over dial-up lines. That pain spawned the GIF (Graphics Interchange Format) in 1987. While GIFs got the job done back then, they suffered from terrible color limits and messy patent lawsuits, which quickly paved the way for JPEG and PNG to take over.
Fast forward to today, and we’re practically drowning in image formats. Optimizing them usually means wrestling with bloated software like Photoshop—which costs a monthly subscription and takes hours of tutorials just to figure out how to resize a family photo or a site banner.
That’s why we built ImageCompressor.com. It’s a free, zero-hassle image compressor that handles all the technical heavy lifting directly in your browser, without requiring any photo editing skills.
Here’s a practical, plain-English breakdown of how image compression actually works, why privacy matters when shrinking files, and how to get the best results for every format.
Lossy vs. Lossless Compression: What’s the Difference?
At a high level, every compression tool uses one of two methods: Lossy or Lossless.
    ┌─────────────────────────────────────────────────────────────┐
    │                     IMAGE COMPRESSION                       │
    └──────────────┬───────────────────────────────┬──────────────┘
                   │                               │
                   ▼                               ▼
       ┌──────────────────────┐        ┌──────────────────────┐
       │   LOSSY METHODS      │        │  LOSSLESS METHODS    │
       ├──────────────────────┤        ├──────────────────────┤
       │ • Discards extra data│        │ • Preserves pixels   │
       │ • Massive size drop  │        │ • Moderate size drop │
       │ • Ideal for Web/Email│        │ • Ideal for Print/Doc│
       └──────────────────────┘        └──────────────────────┘
- Lossy Compression: Permanently discards tiny details in the image data that the human eye rarely notices. Small amounts of lossy compression are virtually invisible on screens, but if you push it too far, the image starts looking pixelated or fuzzy.
- Lossless Compression: Shrinks file sizes by organizing data more efficiently without throwing away a single pixel. The quality stays 100% identical to the original, but you won’t get file sizes as small as lossy methods can achieve.
Which one should you use?
If you’re archiving historical documents, working on medical scans, or sending high-resolution photography to a print shop, stick with Lossless. For everything else—website images, social media posts, or email attachments—Lossy is almost always the better choice because it yields far smaller files with no noticeable visual compromise.
The Tech Behind Lossy Compression
Modern lossy formats rely on clever math tricks to trick the human brain into seeing a full-quality image while storing a fraction of the raw data:
- Discrete Cosine Transform (DCT): The math backbone behind JPEGs. It breaks an image into grid blocks and translates raw color values into frequency patterns, discarding high-frequency detail your eyes are least sensitive to.
- Chroma Subsampling: Human eyes detect changes in brightness (luminance) far better than changes in color (chrominance). Chroma subsampling keeps brightness untouched while reducing the resolution of color data.
- Fractal Compression: Great for natural textures like trees, clouds, or water. It identifies repeating geometric patterns (fractals) across an image and stores them as mathematical formulas rather than individual pixels.
- WebP Lossy: Built on Google’s VP8 video codec technology, WebP analyzes surrounding pixel blocks to predict missing details on the fly.
How Lossless Compression Keeps Every Pixel Intact
Lossless algorithms shrink files without losing quality by finding smarter ways to write down data:
- Run-Length Encoding (RLE): One of the oldest methods around (originally used for analog TV signals in 1967 and fax machines). Instead of listing twenty identical white pixels in a row, RLE simply writes:
20x White. - Predictive Coding: Rather than saving full, massive numbers for every pixel in a row, the algorithm stores only the mathematical difference between neighboring pixels.
A Quick Analogy:
Imagine storing two pixel numbers:
1,078,538and1,085,459. Storing both requires 14 digits of data. But if you store1,078,538and the difference (6,921), you only need 11 digits. Multiply that simple shortcut across millions of pixels, and the data savings add up fast.
Next-Gen Image Formats Compared
| Format | Compression Power | Transparency Support | Browser Support | Best Use Case |
| JPEG 2000 | High | Yes | Very Poor | Archival / Niche |
| WebP | Excellent | Yes | Universal (100%) | Mainstream Web Standard |
| AVIF | Ultra High | Yes | High (~93%+) | Modern Web Optimization |
While AVIF offers incredible compression ratios, WebP remains the sweet spot for web publishing today because every single modern browser handles it seamlessly.
Why Browser-Based Compression Matters for Privacy
Most online image tools require you to upload your files to their remote cloud servers.
That creates a massive privacy risk. You have no idea how long your photos sit on a third-party server, who can access them, or if they’re being harvested for training data. If you’re handling confidential business slide decks, medical records, or personal family photos, uploading them to an unknown server can violate privacy regulations like GDPR.
ImageCompressor.com works differently.
Using modern WebAssembly and client-side technology, your images are compressed directly inside your browser. Your photos never leave your device or touch an external server.
Step-by-Step Guide: Optimizing Every Image Format
1. Compressing JPEG Images
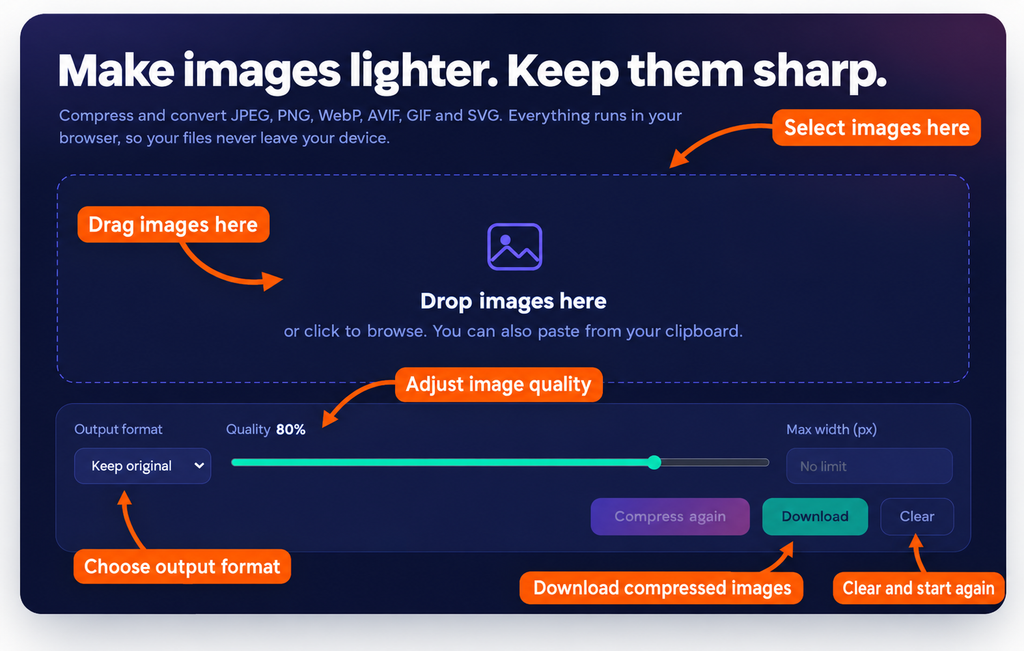
JPEGs rely on a percentage-based quality scale. The standard target for web images is around 80%. Going below 80% shrinks the file size rapidly, but can start introducing subtle visual artifacts.
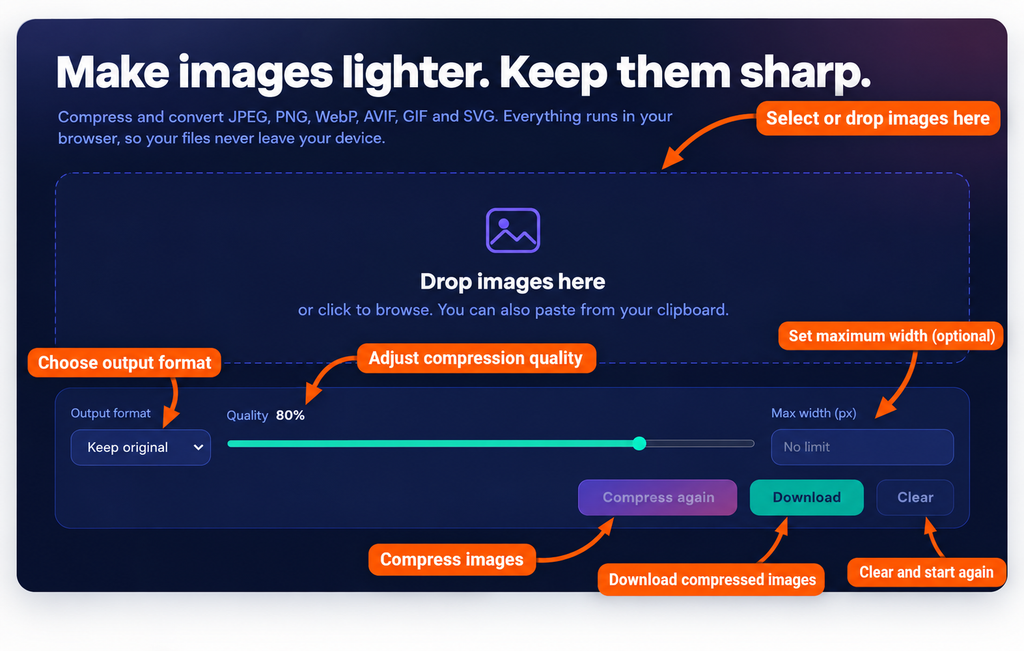
Workflow:
- Drag and drop your
.jpgor.jpegfiles into the compressor. - Adjust the Quality slider (default is set to 80%).
- Preview the estimated file size, then hit Apply.
JPEG Before & After Comparison
| Metric | Original Image | Compressed Image (60% Quality) |
| File Format | JPEG | JPEG |
| Dimensions | 3840 x 2160 px | 3840 x 2160 px |
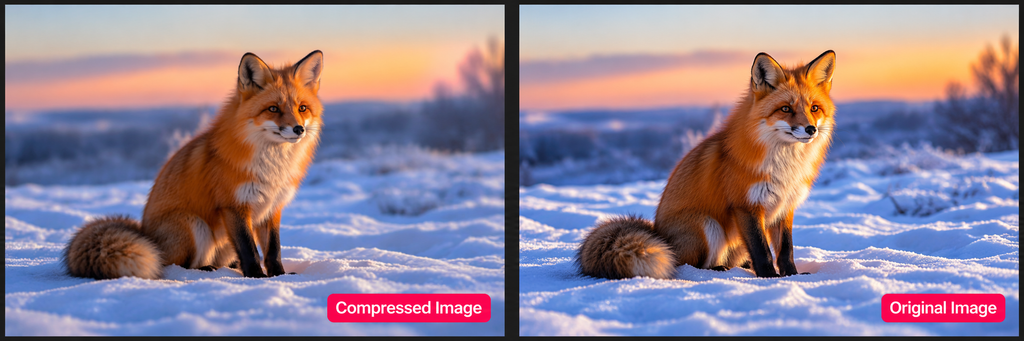
| File Size | 3.8 MB | 680 KB (82% smaller) |
| Visual Quality | Crisp / Lossless | Clean & sharp for web use |
Pro Tip: Smaller images (like thumbnails or cards) can be compressed down to 50–60% quality without any visible loss to human readers.
2. Compressing PNG Images
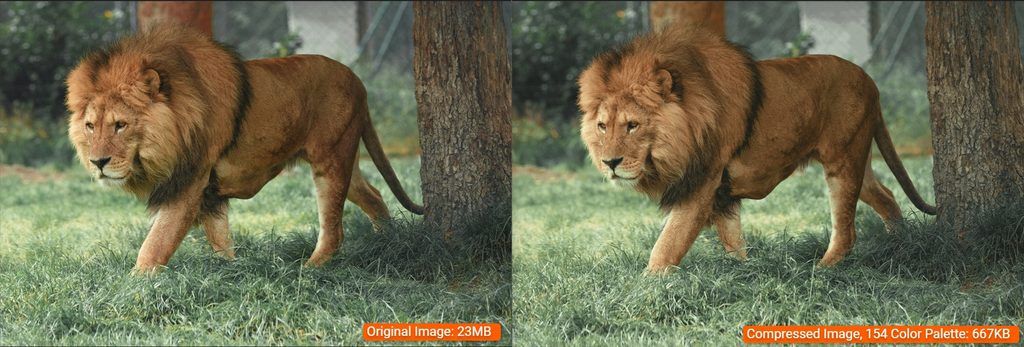
Because PNGs use lossless compression, adjusting “quality” doesn’t work the same way as JPEGs. Instead, PNG compression works by reducing the size of the color palette.
Workflow:
- Upload your PNG file.
- Modify the Colors slider to adjust the color palette count.
- Click Compress.
PNG Before & After Comparison
| Metric | Original PNG | Compressed PNG (154 Colors) |
| File Format | PNG-32 | PNG-8 (Indexed) |
| Color Count | 16.7 Million Colors | 154 Colors |
| File Size | 23.0 MB | 890 KB (96% smaller) |
| Visual Quality | Raw Master | Full sharpness, crisp lines |
3. Compressing WebP Images
WebP combines the lightweight nature of JPEG with the transparency features of PNG. At the exact same visual quality setting, a WebP file is routinely 25% to 35% smaller than an equivalent JPEG.
Workflow:
- Upload your WebP image (or convert a JPEG/PNG to WebP).
- Adjust the quality slider (50–70% recommended for maximum web performance).
- Download the compressed file.
WebP Before & After Comparison
| Metric | Original WebP | Compressed WebP (50% Quality) |
| File Format | WebP | WebP |
| File Size | 1.2 MB | 210 KB (82% smaller) |
| Perceptual Quality | Original | Smooth, no blockiness |
4. Compressing Animated GIFs
GIFs are capped at a maximum palette of 256 colors. To shrink a GIF file, ImageCompressor reduces color redundancies across frames while keeping the motion fluid.
Workflow:
- Drop your
.giffile into the editor. - Drag the color slider down to shave off unnecessary shades.
- Click Apply.
GIF Before & After Comparison
| Metric | Original GIF | Optimized GIF |
| Color Palette | 256 Colors | 64 Colors |
| File Size | 8.5 MB | 2.1 MB (75% smaller) |
| Animation Speed | 30 FPS | 30 FPS (Unchanged) |
5. Compressing SVG Vector Graphics
SVGs don’t use pixel grids. They contain XML text instructions defining geometric shapes and coordinates:
XML
<!-- Unoptimized SVG Code -->
<rect x="-68.953" y="-103.241" width="3663.125" height="2460.237" />
By dialing down the mathematical Precision setting, ImageCompressor strips extra decimal places without altering how the graphic renders:
XML
<!-- Optimized SVG Code (Precision = 0) -->
<rect x="-69" y="-103" width="3663" height="2460" />
SVG Precision Before & After Comparison
| Metric | Original Vector | Optimized Vector (Precision = 0) |
| Coordinate Precision | 3 Decimal Places | 0 Decimal Places |
| File Size | 450 KB | 110 KB (75% smaller) |
| Scalability | Infinite | Infinite (Sharp on all screen sizes) |
Quick Summary
Smaller images keep your website fast, improve search rankings, and make sharing photos over email effortless. You don’t need expensive photo editing software or complex technical skills to compress your files efficiently.
With lizenastyling.com, you get high-ratio compression across every major format while keeping your files 100% private on your own device.